






I was trying to find out the best way to use the Wild Card Cartridge I have it and I have not made any of the envelopes because I don’t know how to work it correctly so here is what one of the other ladies directed me to, Hope it helps:
Below is MamaC chart of sizing for the Wild Card:
Envelope and Card measurements are made using a 12x12 mat. Envelopes are cut using “Fit to Page”. The cards are numbered according to the order in the handbook. #1 card is on page 32 of the handbook, #2 is on page 33…etc.
Thanks to Robyn the Pink Stamper for developing this numbering system. **Compliments of MamaC**
Card Description Envelope Size Card Size
ROW 1
#1 Scallop Card 3 ¾ inches 3 ¾ inches
#2 Argyle Card 6 inches 6 inches
#3 Square Card 4 ½ inches 4 ½ inches
#4 Stitched Card 6 ¼ inches 6 ¼ inches
#5 Trifold Card 6 ¾ inches 6 ¾ inches
#6 Invite Card 6 ½ inches 4 ½ inches (necessary size adjustment)
#7 Booklet Card 6 ¾ inches 5 ¼ inches (necessary size adjustment)
#8 Oval Card 6 ¼ inches 6 ¼ inches
#9 Birthday Card 6 ¾ inches 6 ¾ inches
#10 Joy Card 5 ¾ inches 5 ¾ inches
ROW 2
#11 Swoop Card 4 inches 4 inches
#12 Leaf Card 6 ¼ inches 6 ¼ inches
#13 Tied Up Card 4 inches 2 ¾ inches (necessary size adjustment)
#14 Triangle Card 6 ¼ inches 6 ¼ inches
#15 All in One Card 6 ½ inches 6 ½ inches
#16 Tweety Card 5 inches 5 inches
#17 Circle Card 4 inches 4 inches
#18 Thanks Card 6 ¼ inches 6 ¼ inches
#19 Wave Card 7 inches 6 ¾ inches (necessary size adjustment)
#20 Pinwheel Card 6 ½ inches 6 ½ inches
ROW 3
#21 Doily Card 5 inches 5 inches
#22 Quotes Card 7 inches 7 inches
#23 Thinking Card 6 inches 6 inches
#24 Porthold Card 5 ½ inches 5 ½ inches
#25 Flower Card 4 ¾ inches 4 ¾ inches
#26 Branch Card 7 inches 7 inches
#27 Hello Card 5 ¼ inches 5 ¼ inches
#28 Star Card 5 ½ inches 5 ½ inches
#29 Wow Card 4 ½ inches 3 ¾ inches (necessary size adjustment)
#30 Cupcake Card 5 ¼ inches 5 ¼ inches Card Description Envelope Size Card Size
ROW 4
#31 Present Card 7 ½ inches 7 ½ inches
#32 Cake Card 5 ¼ inches 5 ¼ inches
#33 Safety Pin Card 5 inches 5 inches
#34 Bandaid Card 6 ¼ inches 6 ¼ inches
#35 Father Card 4 ½ inches 4 ½ inches
#36 Heart Card 4 ¾ inches 4 ¾ inches
#37 Pumpkin Card 3 ¾ inches 3 ¾ inches
#38 #1 Card 6 ½ inches 6 ½ inches
#39 Gift Card 7 ¼ inches 7 ¼ inches
#40 Monster Card 5 inches 5 inches
ROW 5
#41 Owl Card 5 ¼ inches 5 ¼ inches
#42 Graduate Card 7 ½ inches 7 ½ inches
#43 Ornament Card 5 inches 5 inches
#44 House Card 7 ¾ inches 7 ¾ inches
#45 Carriage Card 6 inches 6 inches
#46 Hanukkah Card 5 ¼ inches 5 ¼ inches
#47 Celebrate Card 5 ½ inches 5 ½ inches
#48 Shower Card 8 inches 8 inches
#49 Gift Box One 7 inches Gift Box Two (shift) 5 ¾ inches
#50 Envelope One 6 ¼ inches Envelope Two (shift) 5 ¼ inches
Showing posts with label How To. Show all posts
Showing posts with label How To. Show all posts
Sunday, September 6, 2009

Sunday, June 28, 2009
EK Success Cutter bee Bugs
I finally learned how to use these. Know will I ever get to actually use them in my stuff? Have you used them before? And what have you used them on?
Wednesday, December 3, 2008
Christmas Trees Completed!!
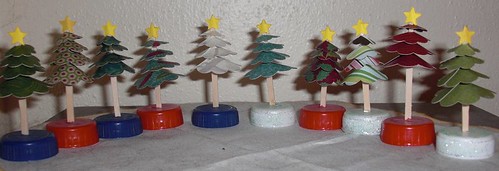
So here they all are!! Finally they are all finished!! I will put 2 trees per table for the party there is 5 tables! I think they came out very nice. Witch one is your favorite? Mine is the white one.
I had some comments on a forum about how to make these so here are the directions good luck and if you have any questions I will try to help you with a little more explanation.
All I ask is that you do not summit this project to be published without my OK. I came up with this idea just by looking at another picture in a magazine and it was a metal tree I believe.
3Demantali Christmas Tree
Items Needed:
Cuttlebug Machine and spacers
Cuttlebug 2''x2'' Dies 4/pkg-Flower #1
Cuttlebug 2''X2'' Die-Snowflake #2 or Star punch
Something to punch a small hole not a hole punch size just a little smaller.
Thin Popsicle Sticks
Pretty paper of your choice for Tree and Star
Craft Glue and Glue Stick or glue dots
Scissors
How To:
Cut your Flower dies from the paper that you’re planning to make your tree from, one of each 4.
Then cute 2 of the lager Star from the Snowflake die or use your Star punch.
Then punch your hole in the center of the 4 flowers.
Next cut a line between the scalps of the flower to the hole, do not cut the flower in two.
Now it’s time to assemble the tree, start with the larger flower first. You have a choice of gluing the flower overlapping one or two of the scalp parts of the flowers. (I made a verity of both types.) As you’re doing this you need to make sure that your stick will fit in the hole that you’re going to be leaving so as your gluing the flower you should check the popsicle stick if it will fit in the middle of the hole your leaving. You can put a little bit of the Craft glue to hold it in place on the Popsicle stick for the trees stem. You will do this for all 4 remember to start with the bottom up, leaving a small bit to attach the star.
Last but no means last you will glue your stars on the top of the stick. Hopefully you left some room on the stick. You should glue one star on one side and the other on the other side, back to back with the stick in the middle.
The tree is complete now; you will have to come up with your own stand. I used soda pop bottle leads. You could use clay and form it so that it looks like a dress skirt.
Hope this helps have fun in making them.
Subscribe to:
Posts (Atom)